Create a Collection
Learn how to create a Myria collection.
Please note, in the Staging environment you can create five collections and 50,000 mint transactions per collection per month.
If you want to create collections for your project in the Production environment, or you need to increase those limits, please contact our team.
Be sure to include your project id in the request message.
Prerequisites
- Basic Javascript and Typescript knowledge
- Web IDE such as VS Code
- Latest NodeJs
- Web3 wallet address and Stark Key
- Typescript project created here or a new one with similar structure
- Registered Myria developer account and project
1. Deploy a contract
First, deploy an Ethereum smart contract that implements the mintFor function.
If the deployment is successful, you will get the associated contract address, which you will need to create a new collection.
There's no need to write any Solidity code. The example provided below contains everything required to deploy your contract.
1.1 Get the Alchemy key
Web3 developers consume data via RPC calls from one of the nodes on the network. Hosting nodes is expensive. That's why it's common to use third-party services like Alchemy or Infura.
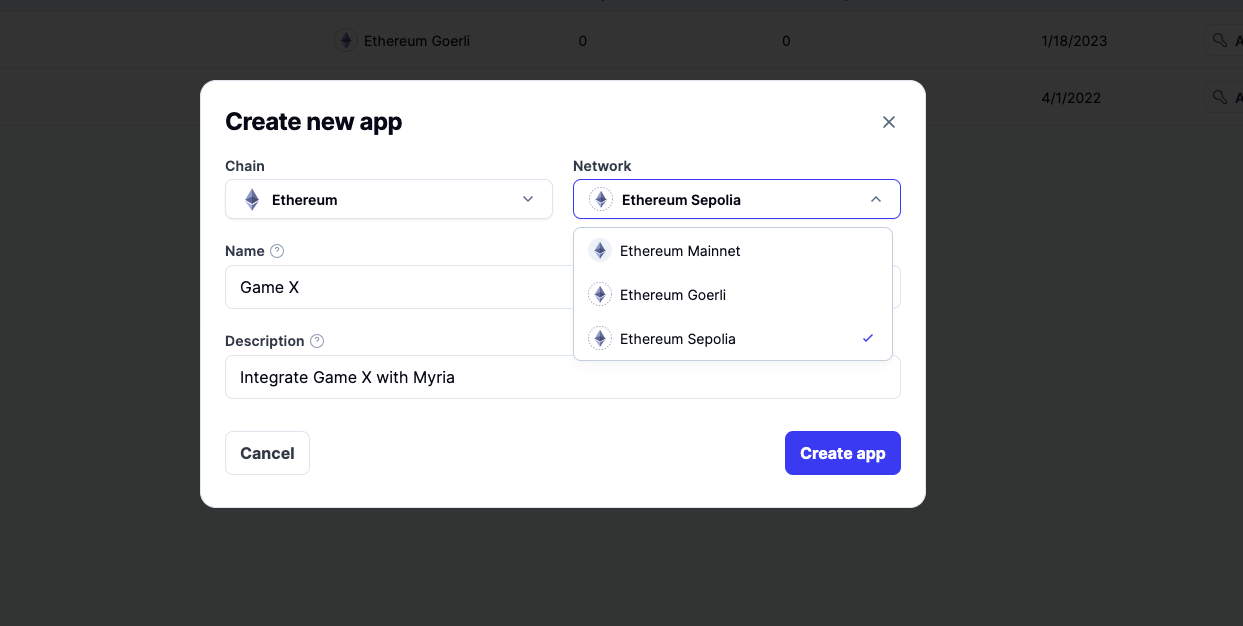
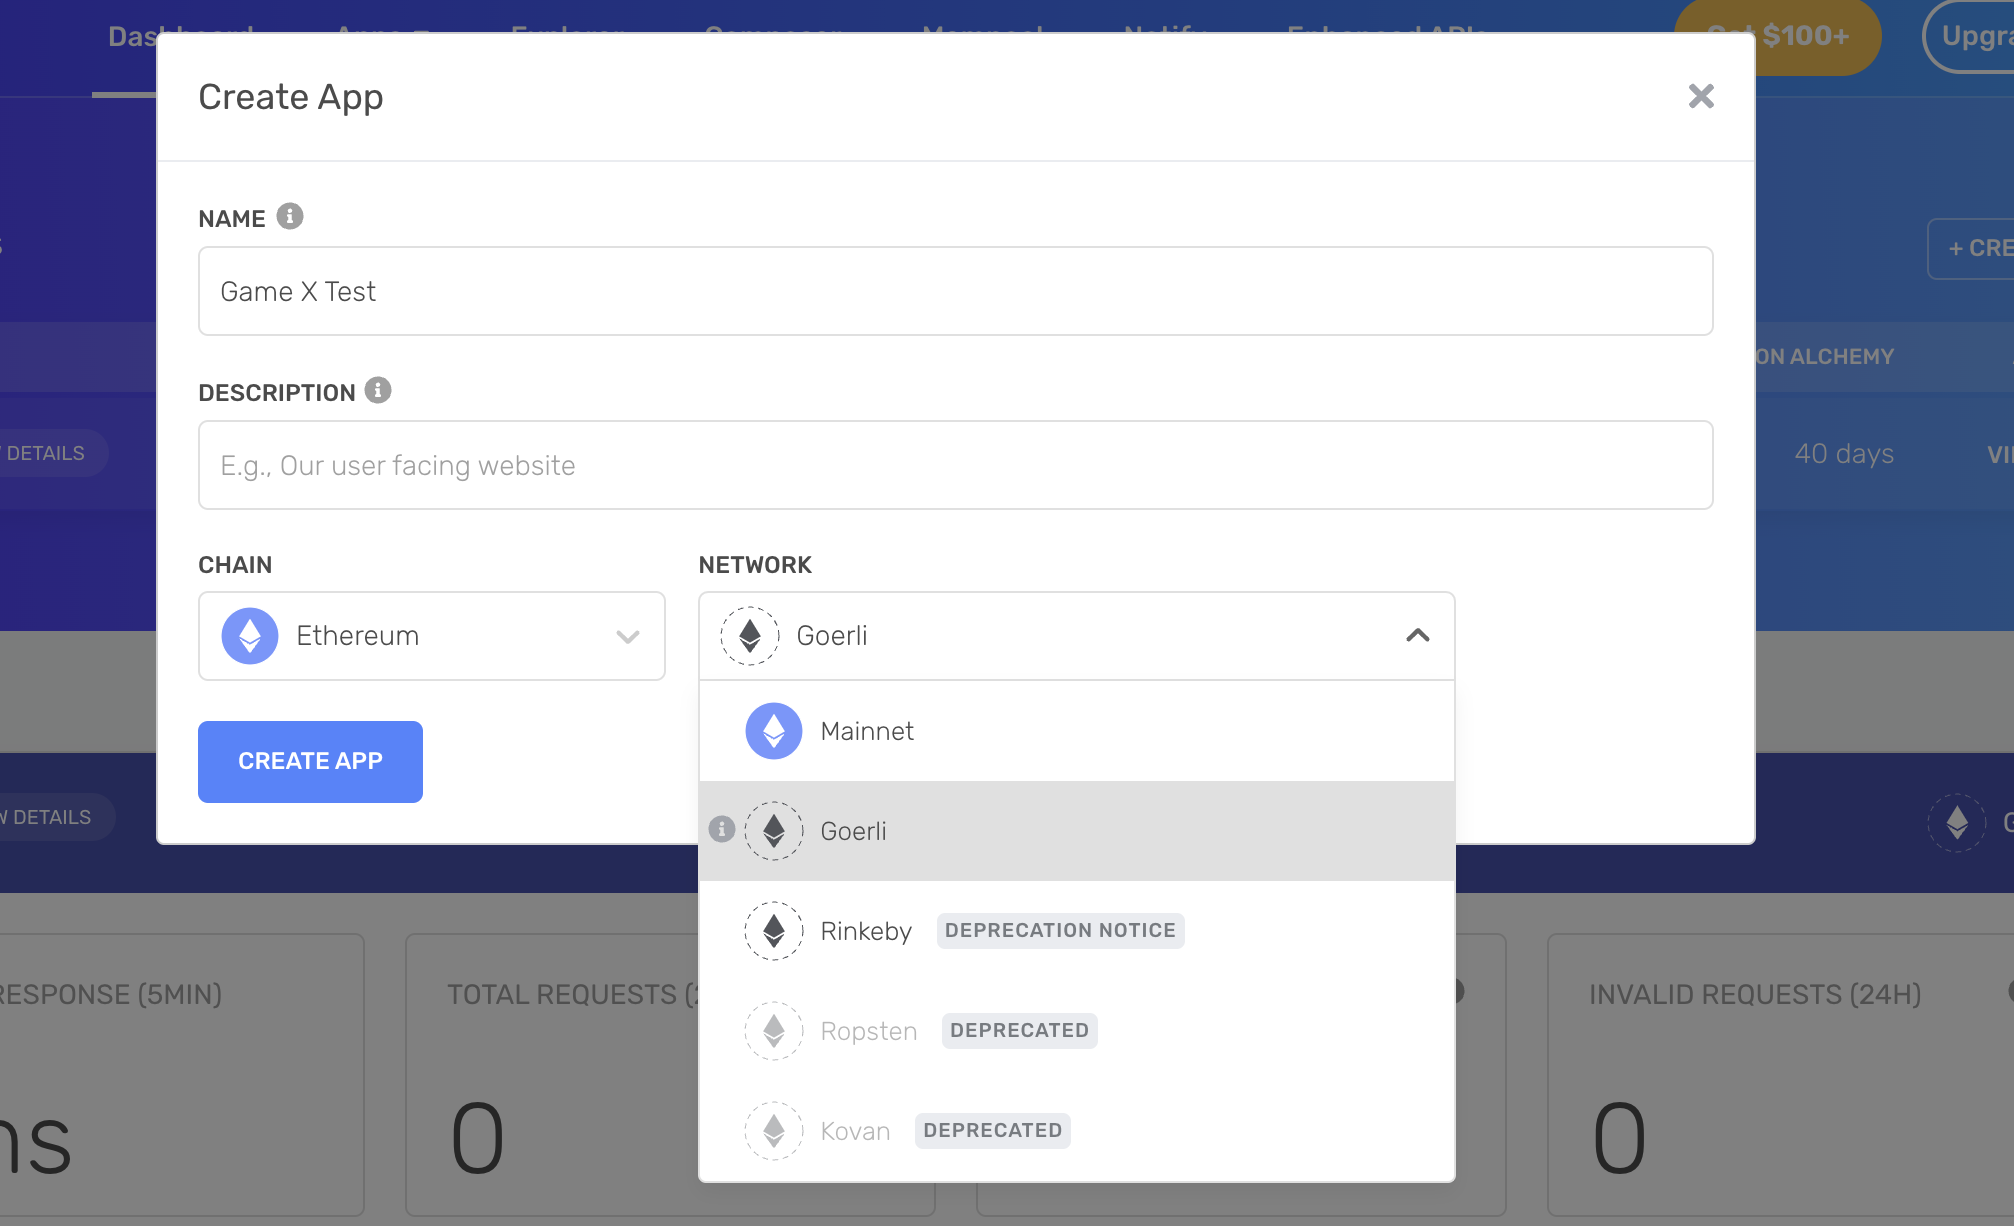
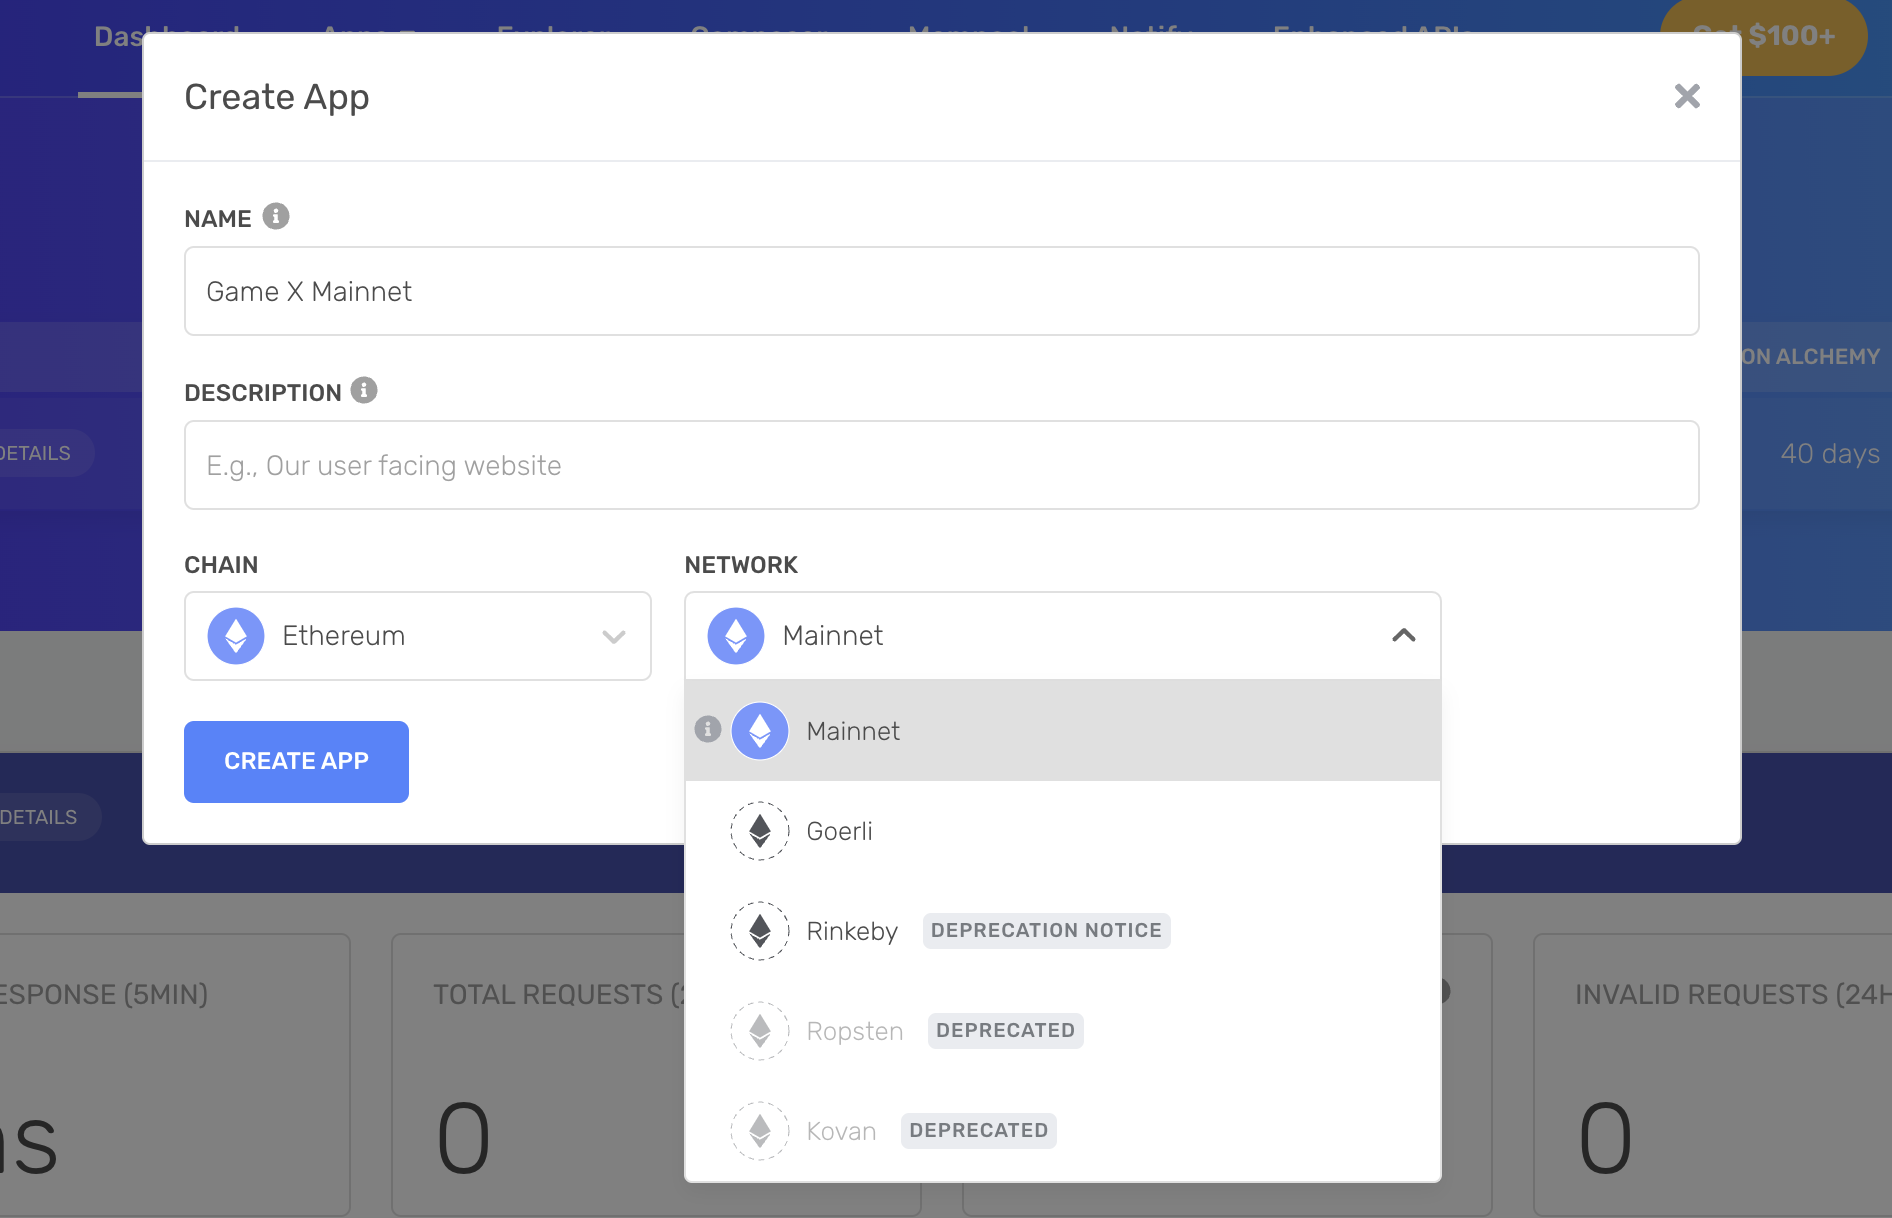
This guide will use Alchemy as an example. Once you set up and log into your account, create a new app, and choose the network to work with as follows:
- Sepolia Testnet (Recommendation)
- Goerli Testnet (Deprecated)
- Ethereum Mainnet
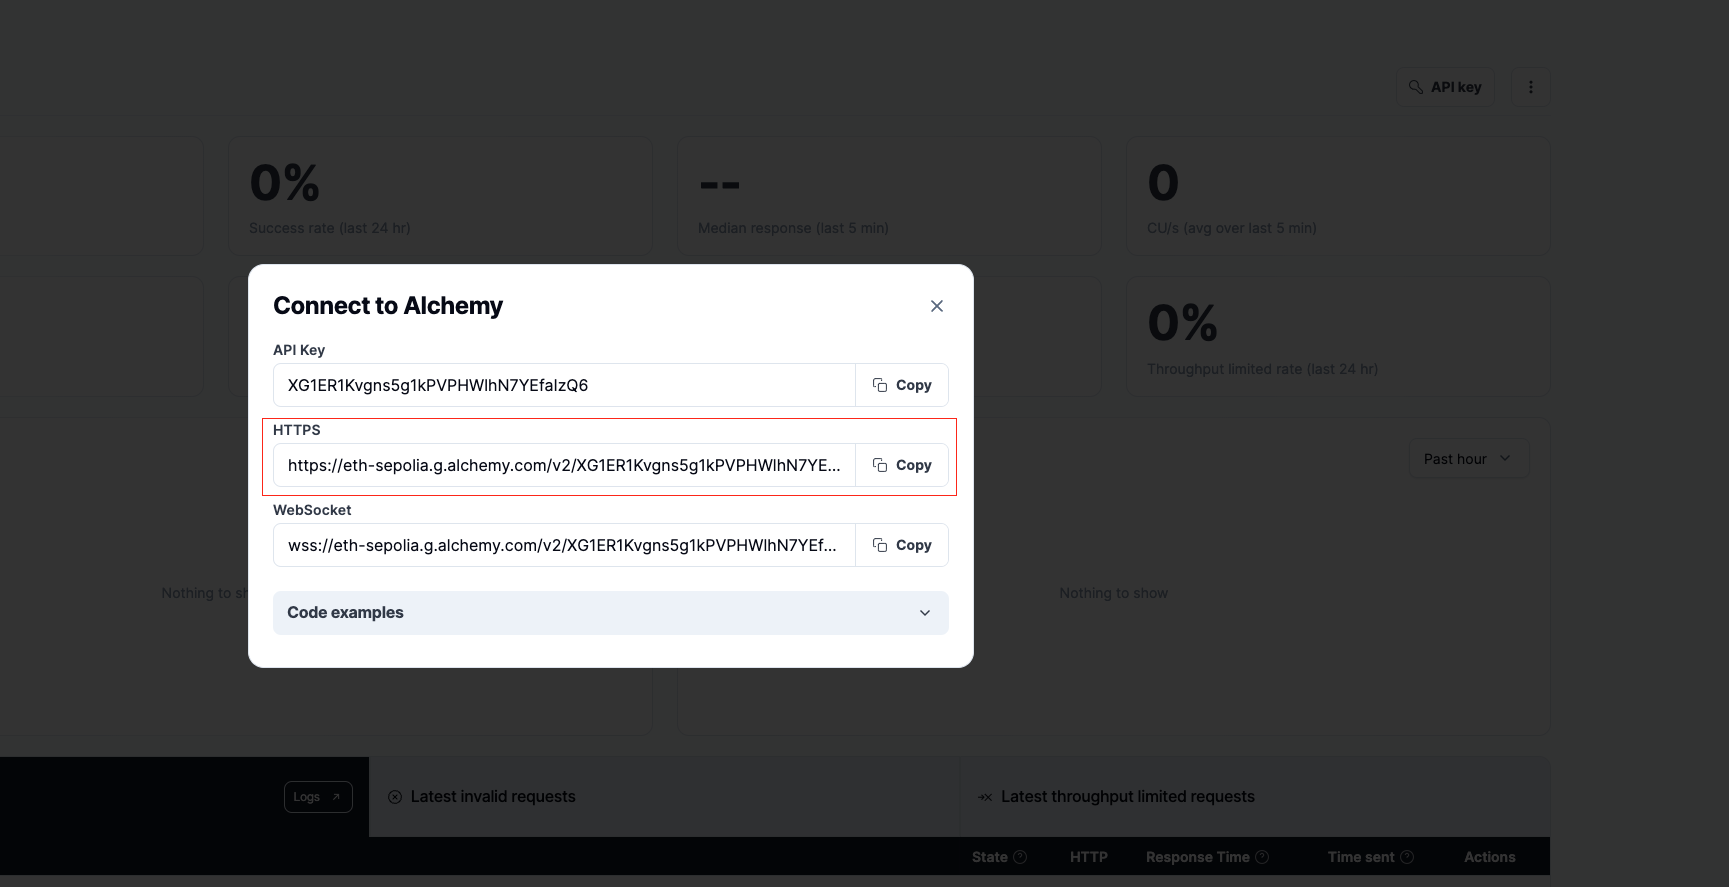
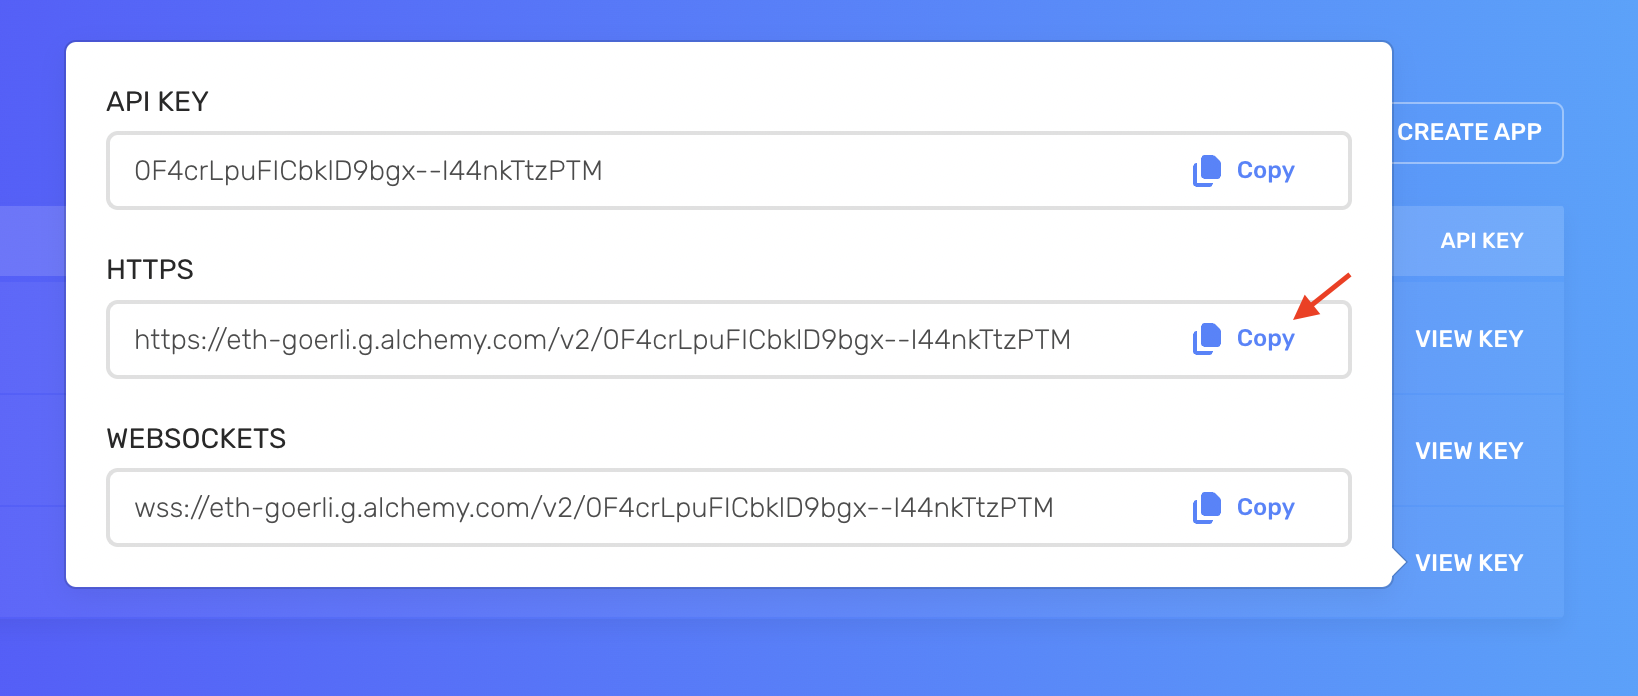
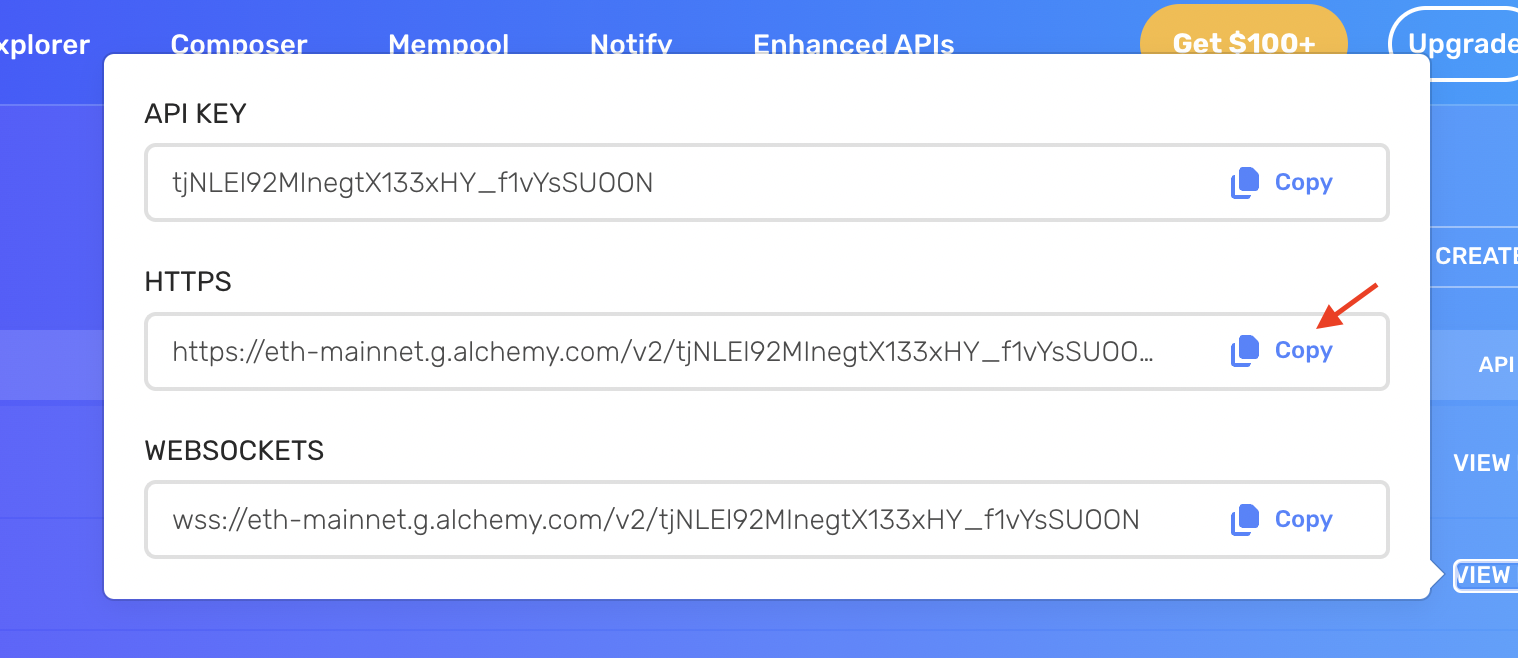
After you set up the app, reveal your Alchemy key by selecting VIEW KEY near the name of your app.
Copy and save the HTTPS key. You'll need to use it in further steps.
After you set up the app, reveal your Alchemy key by selecting VIEW KEY near the name of your app.
Copy and save the HTTPS key. You'll need to use it in further steps.
After you set up the app, reveal your Alchemy key by selecting VIEW KEY near the name of your app.
Copy and save the HTTPS key. You'll need to use it in further steps.
1.2 Fund your Web wallet
Code deployments to the Ethereum blockchain require ETH to pay associated fees.
- Sepolia Testnet (Recommendation)
- Goerli Testnet (Deprecated)
- Ethereum Mainnet
The example below uses Sepolia and requires test ETH on the Sepolia testnet. You can request test funds from Sepolia faucet by Alchemy.
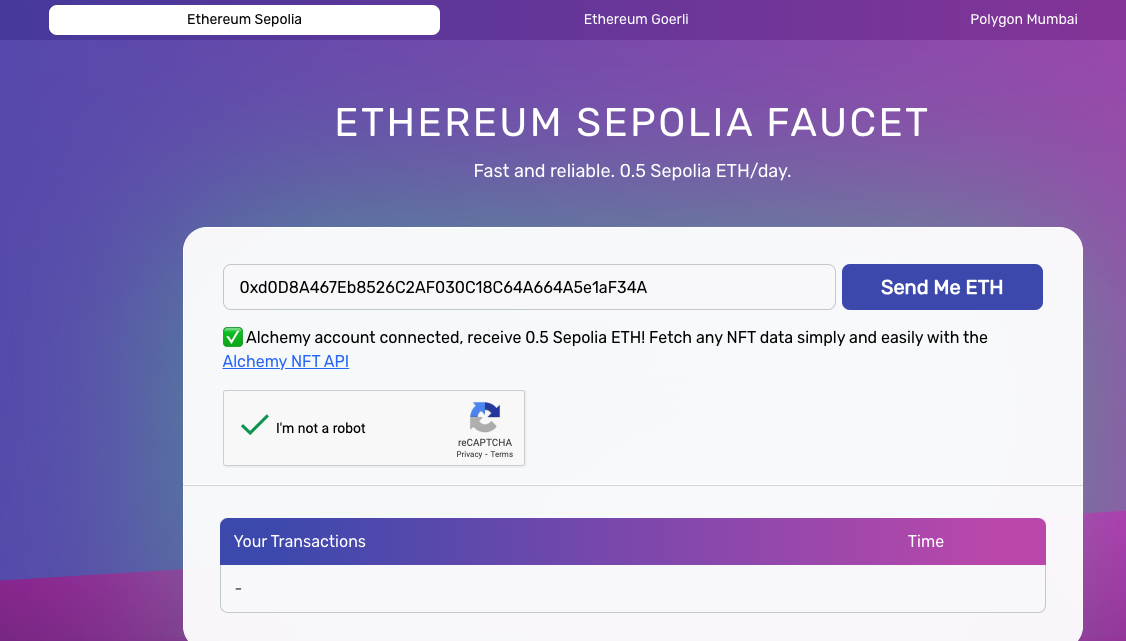
To request a Sepolia faucet, switch to the Sepolia network in your MetaMask, copy and paste your wallet address and click Send me ETH. As a result, you should see tokens in your wallet as follows:
Access to the sepolia faucet page.
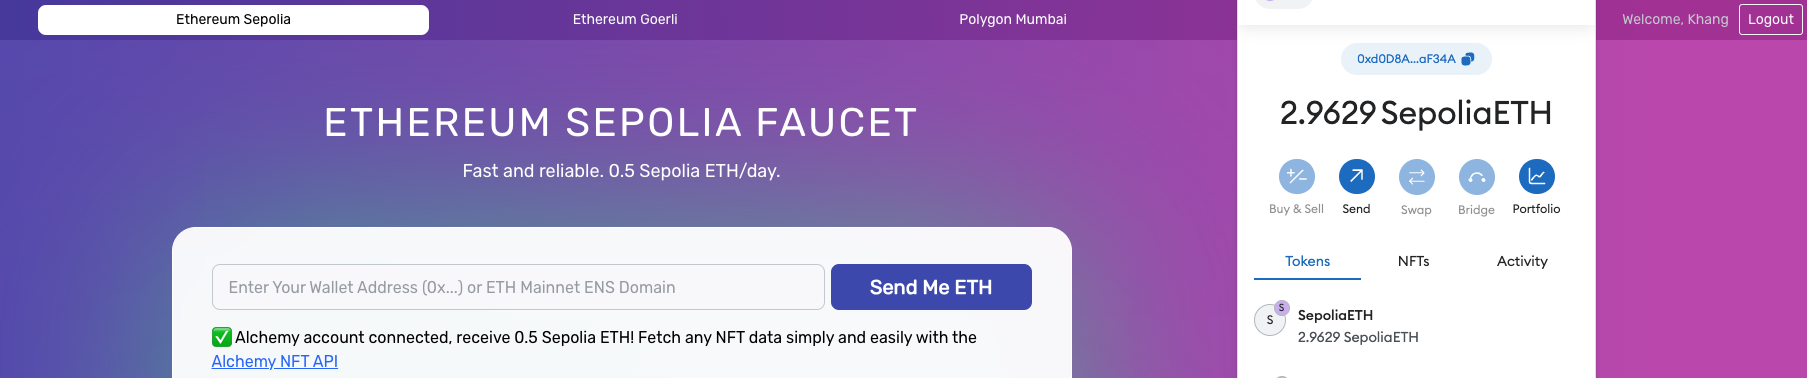
Register/Login to input your wallet address to topup Sepolia faucet token.
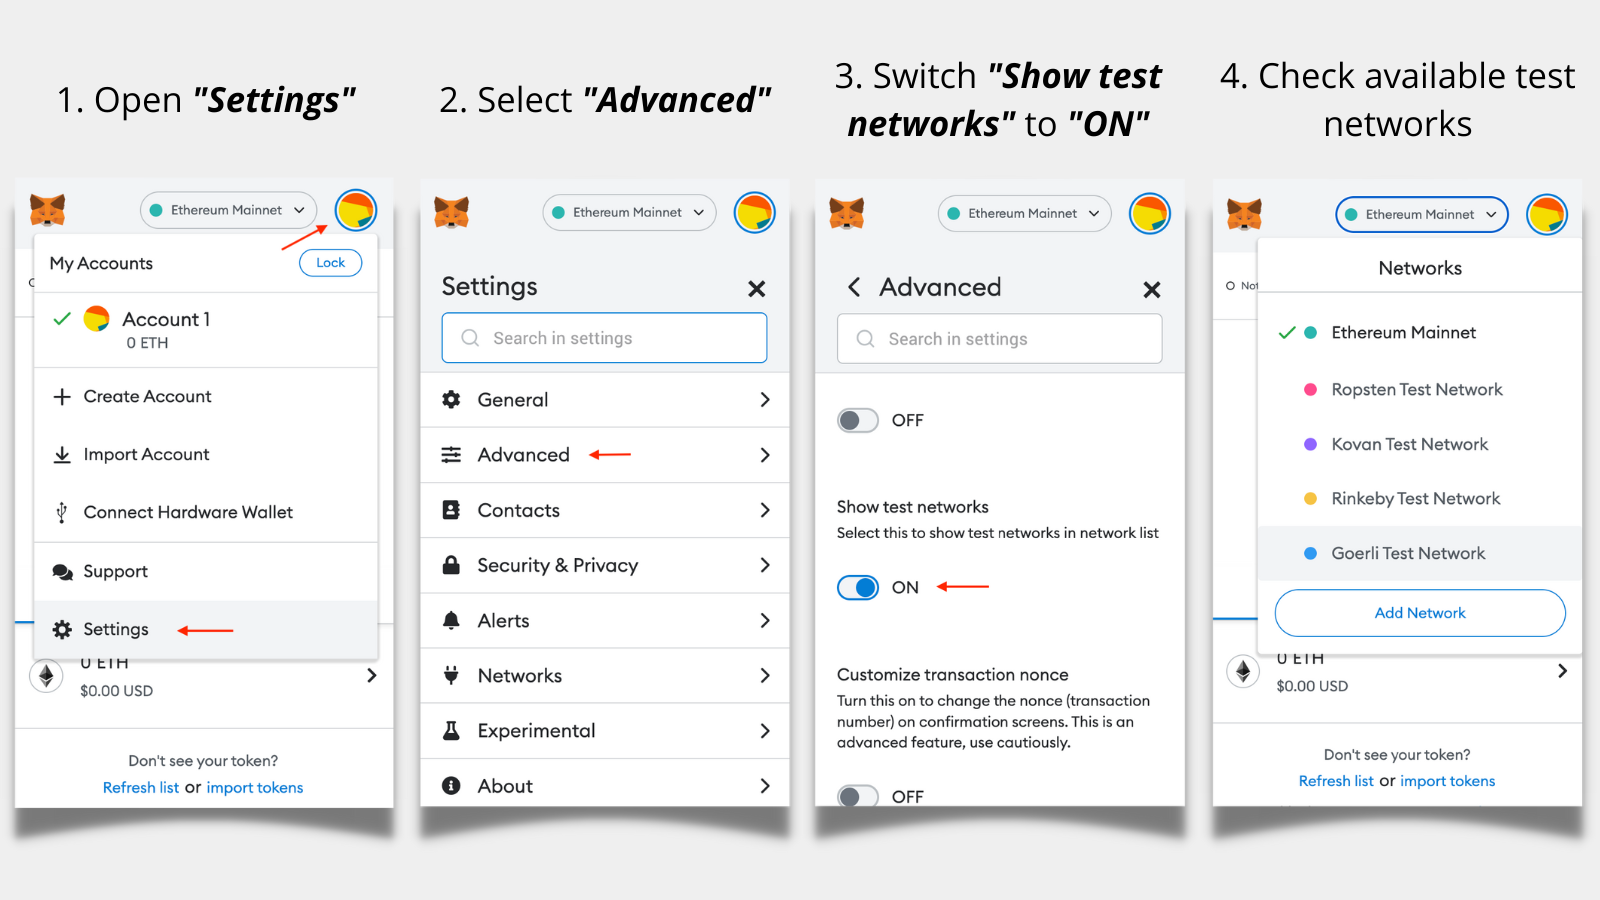
When you install MetaMask the first time, it may have test networks disabled. To enable those, use the following steps:
The example below uses Goerli and requires test ETH on the Goerli testnet. You can request test funds from Goerli faucet by Alchemy.
To request a Goerli faucet, switch to the Goerli network in your MetaMask, copy and paste your wallet address and click Send me ETH. As a result, you should see tokens in your wallet as follows:

When you install MetaMask the first time, it may have test networks disabled. To enable those, use the following steps:
The example below uses Ethereum mainnet as an example. When you deploy contracts to the mainnet, you need real ETH that you can purchase from one of the crypto exchanges (Binance, FTX, etc.)
1.3 Clone the repository
git clone https://github.com/MyriaPlatform/myria-smart-contract.git
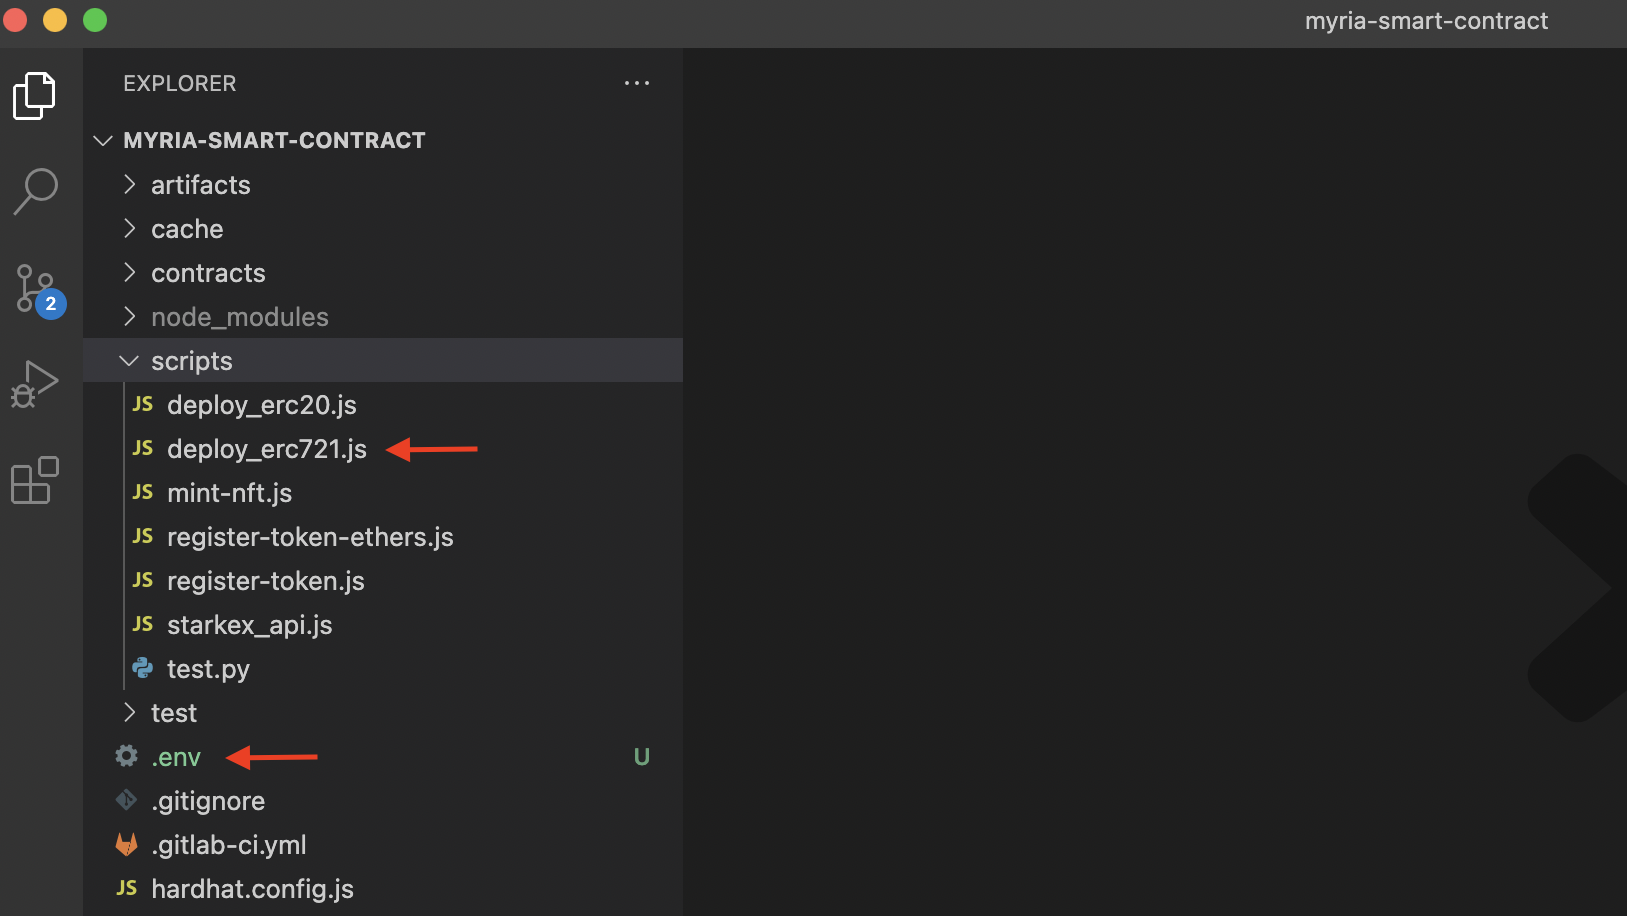
1.4 Open your contract in Visual Studio Code
1.5 Setup the project
To set up the project, first install the dependencies:
yarn
Then, rename the .env.example into .env and change the variables as follows:
API_URL- the RPC URL on the corresponding network (testnet or mainnet)PRIVATE_KEY- the private key of your Web3 walletPUBLIC_KEY- the public key of your Web3 walletSTARKEX_ADDRESS- StarkEx Myria contract:- Goerli Testnet (staging):
0xF82C423a30E317f34f9b0997627F2F9c5d239Ad9 - Ethereum Mainnet (production):
0x3071BE11F9e92A9eb28F305e1Fa033cD102714e7
- Goerli Testnet (staging):
1.6 Deploy the contract
Finally, run the deploy.js script to deploy the contract:
yarn deploy-erc721
1.7 Get your contract address
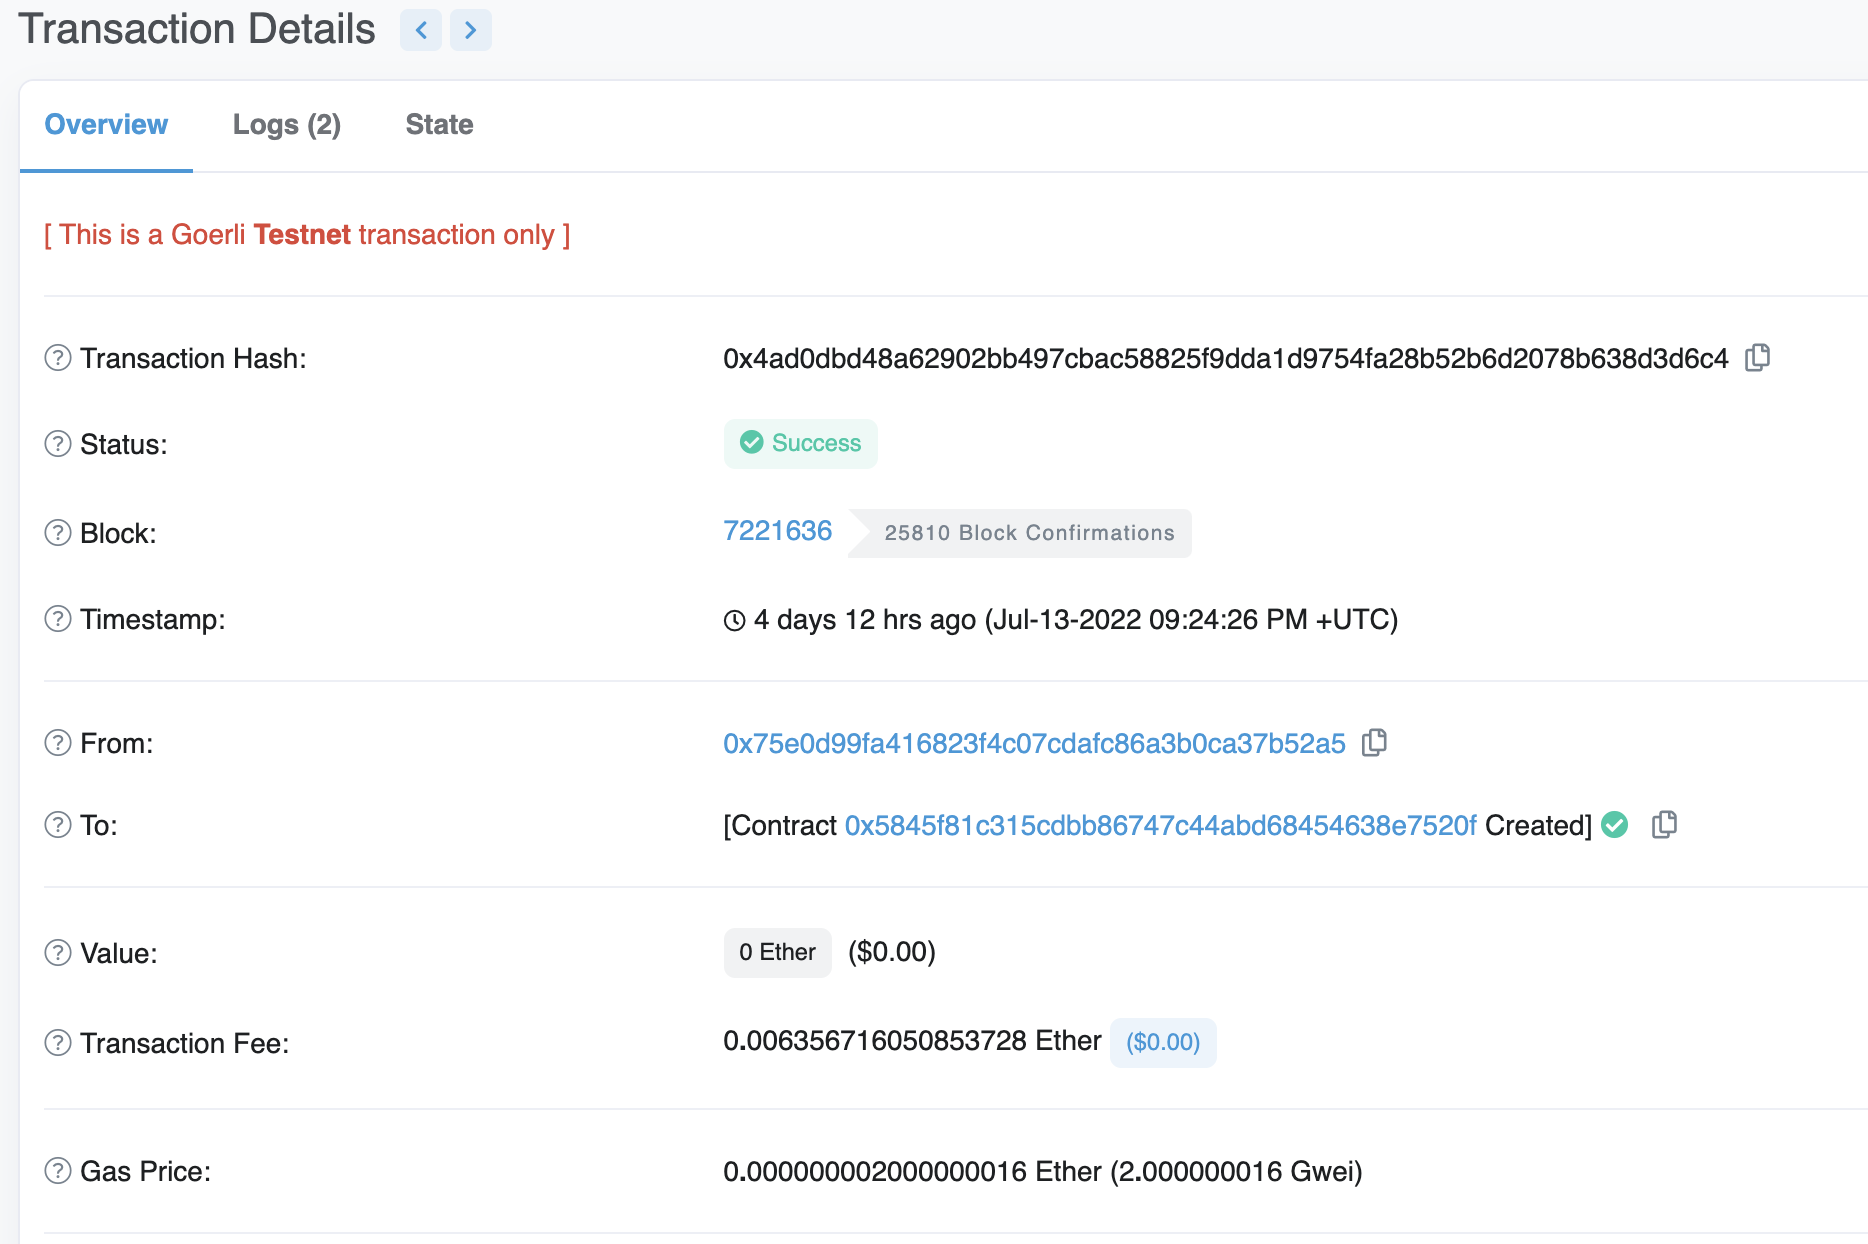
If the deployment is successful, you will get the contract address and transaction hash to check transaction details. Copy and save this address somewhere. You'll need to use it later.
If you want more details about the contract, wallet, or blockchain transactions, you can use one of the blockchain explorers, such as Etherscan.
Here's an example of deployed contract address on the Goerli testnet: 0x5845f81c315cdbb86747c44abd68454638e7520f.
2. Create the Metadata API URL
Each collection requires a metadataApiUrl that defines the metadata schema for containing assets.
The URL should return a JSON object and have a predefined structure. There are three ways to create your metadataApiUrl.
The below steps show Pinata as an example.
2.1 Create a Pinata account
You can create an account through the official Pinata website.
2.2 Upload media files
After you create the account, upload your media files to Pinata. When preparing media files for your collection, consider these rules:
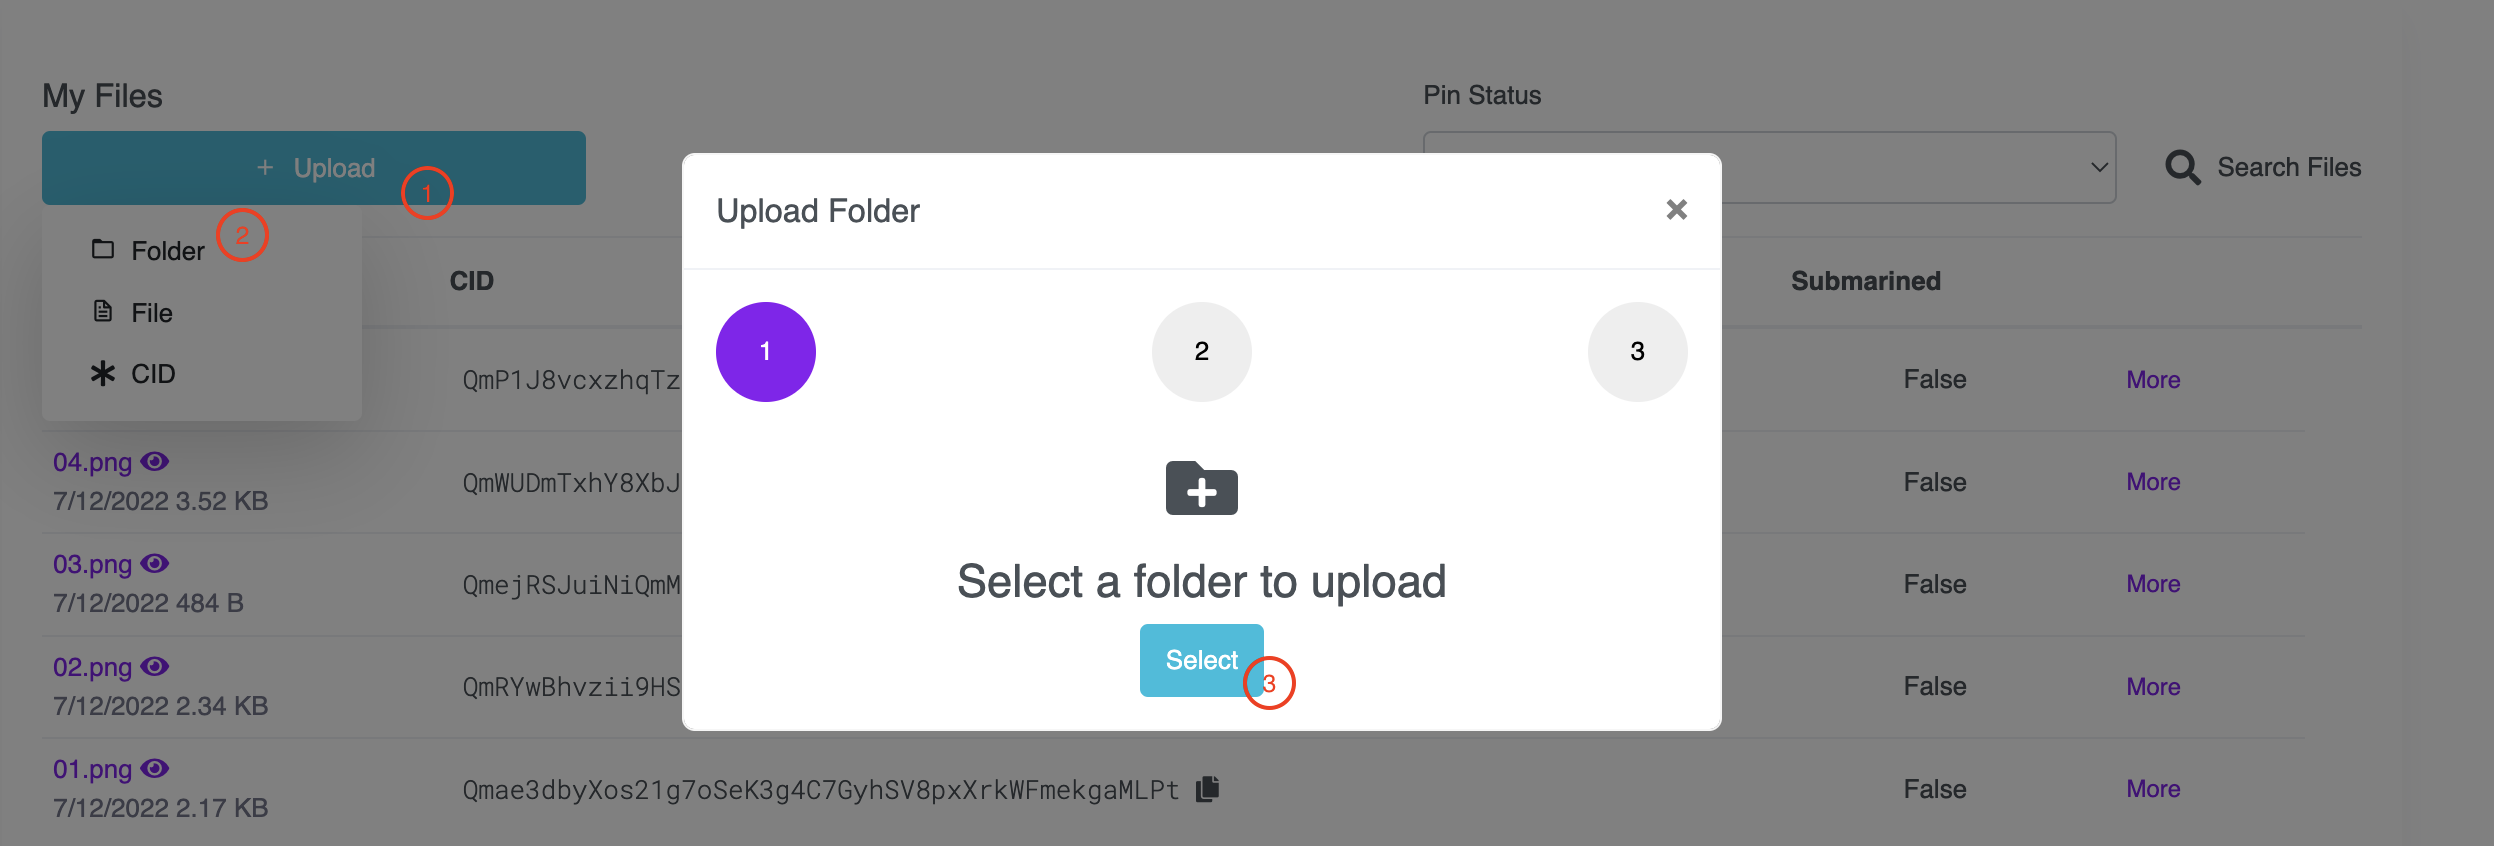
- If you have all the media files ready, upload the entire folder with your files. Pinata will generate a link containing those files for you. Note that you won't be able to add or remove items from that folder so use this option only if your collection will remain the same. Here's an example:

- If you don't have all your media files ready or you plan to expand your collection gradually, then upload individual files to the root Pinata folder as follows:

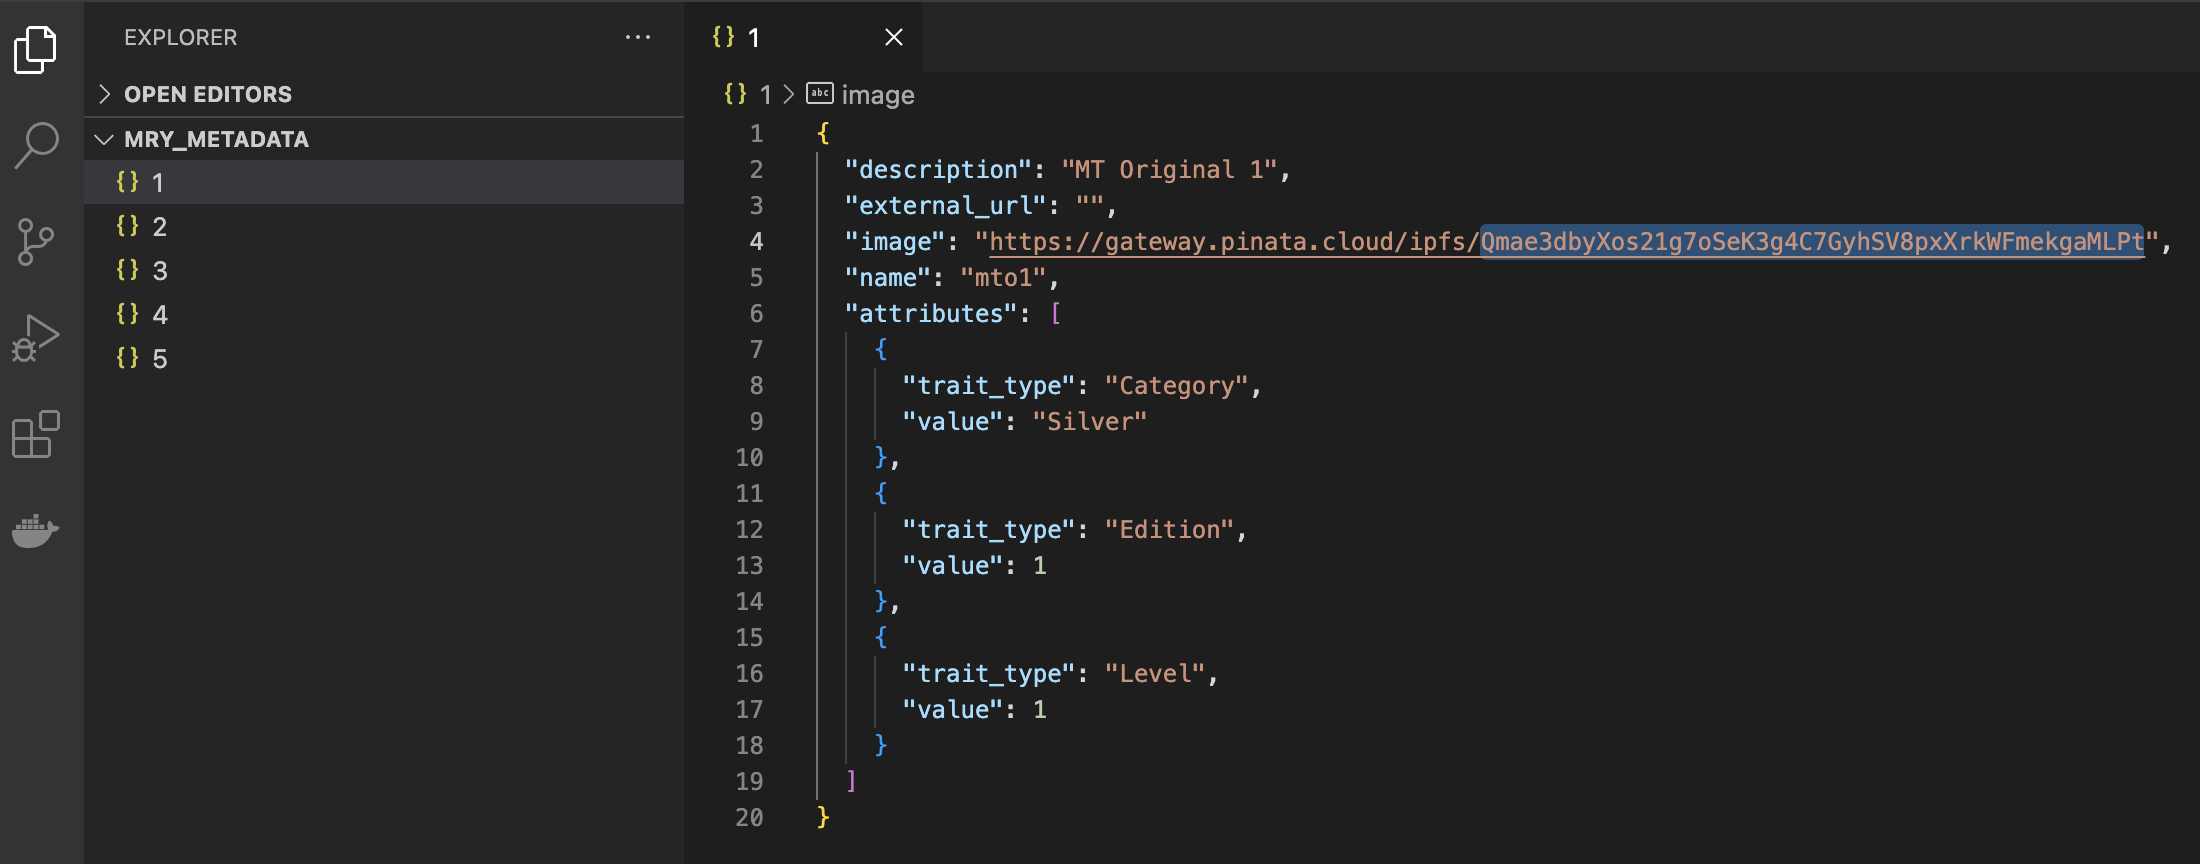
Files or folders in Pinata are identified by a unique CID and have the following URL structure:
https://gateway.pinata.cloud/ipfs/CID
For example, https://gateway.pinata.cloud/ipfs/Qmae3dbyXos21g7oSeK3g4C7GyhSV8pxXrkWFmekgaMLPt.
2.3 Create metadata files
Next, create metadata files for all assets within a collection. Each file represents a JSON object that defines the asset's metadata schema. Those files will give a unique identifier to each of the assets, also known as Token ID. You can create files in any IDE as follows:
Make sure to follow these rules for creating the metadata files:
- File names should not have any extension and should have plain numbers as their names
- All files should follow the same metadata schema
- The
nameproperty should be unique for each file - The
imageproperty should point to the corresponding image on Pinata - The
external_urlproperty should point to the corresponding image URL of the collection's website
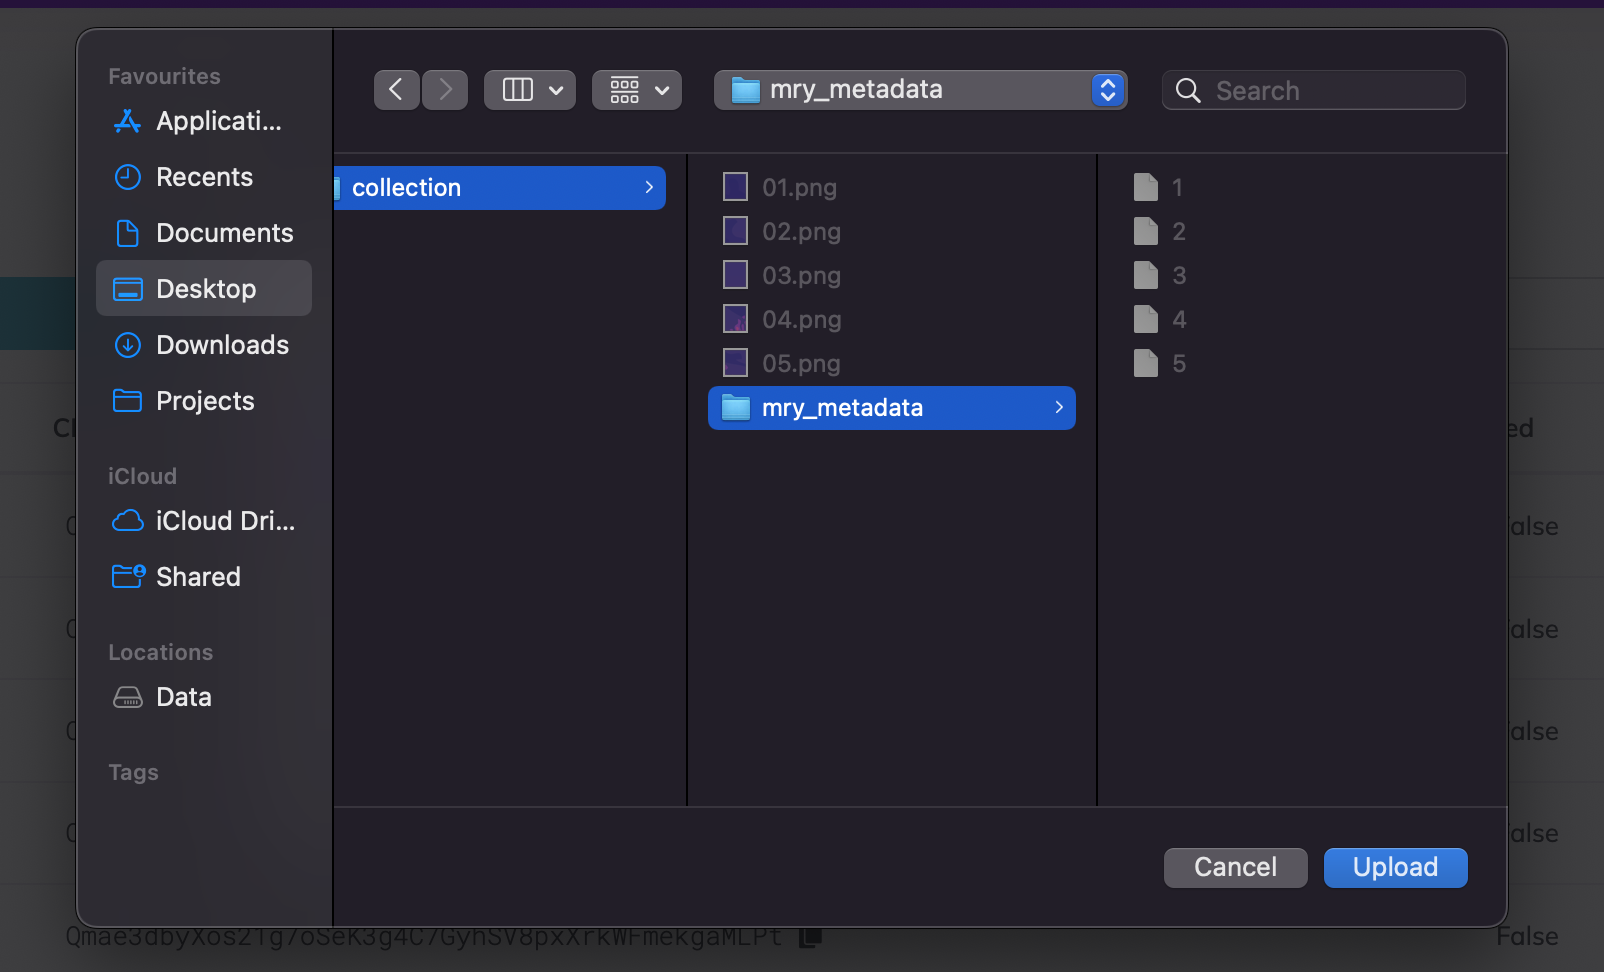
2.4 Upload metadata folder to Pinata
Once you have your metadata files ready, upload the entire folder to your Pinata account:
The contents of the metadata folder should have all of the files created earlier in VS Code:
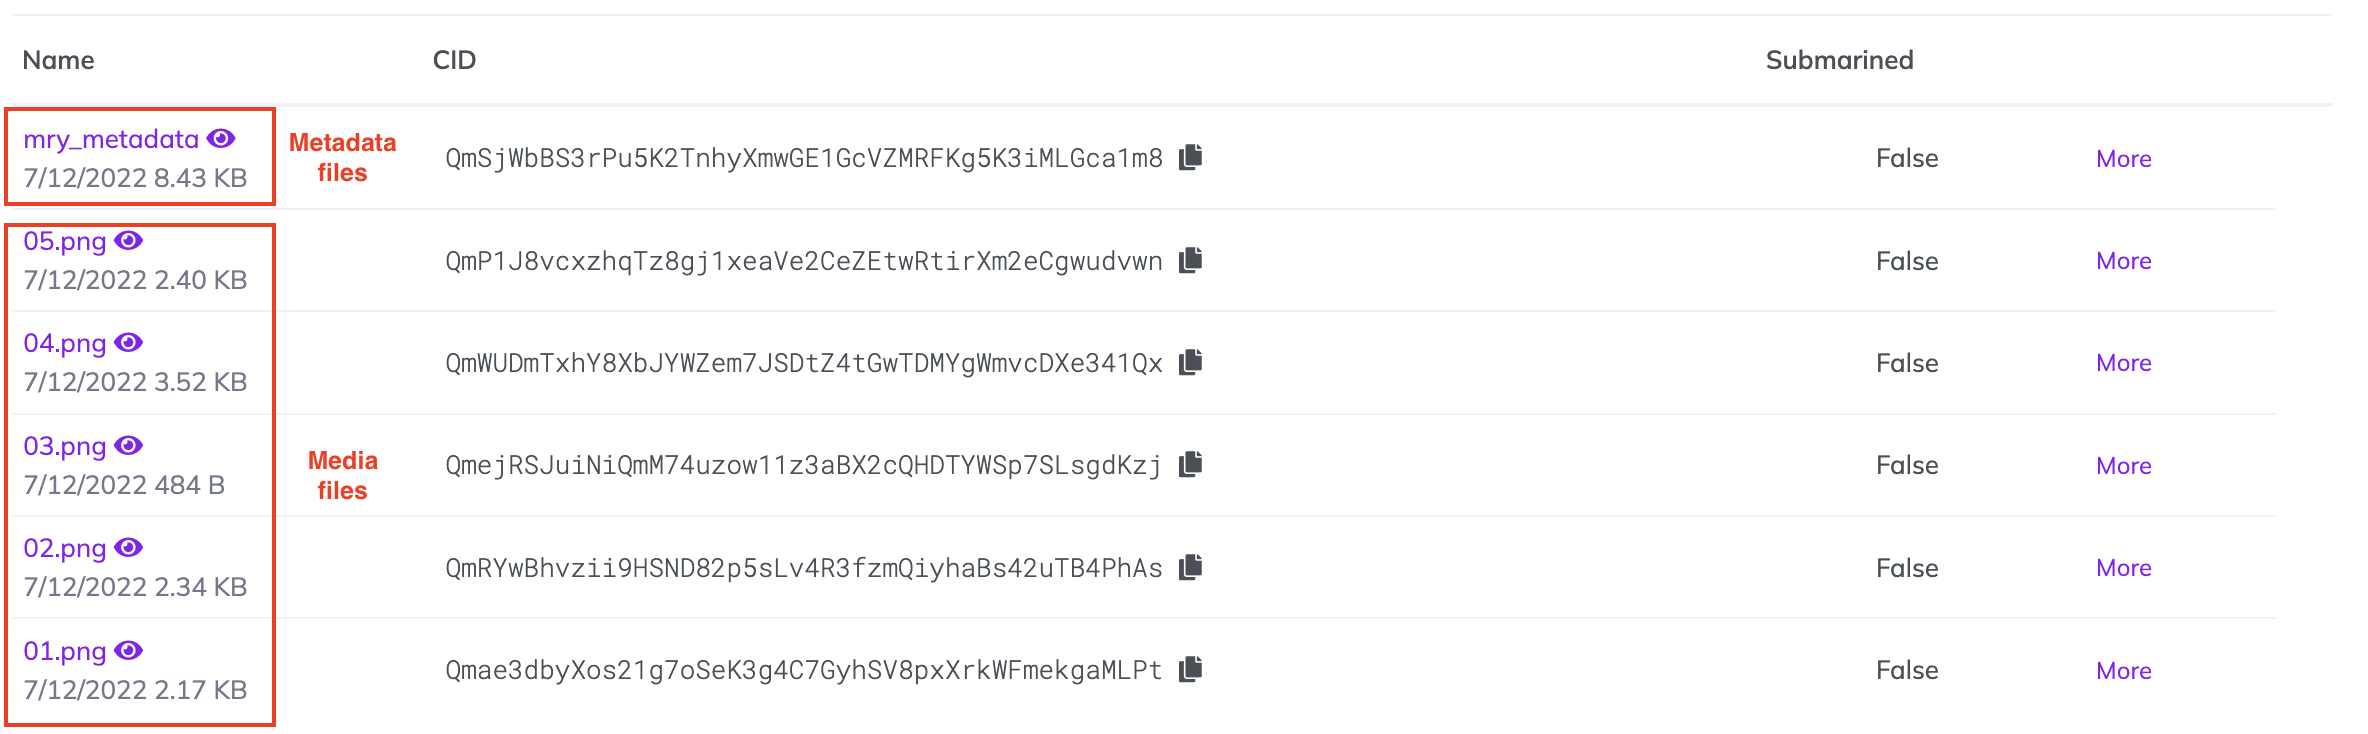
As a result, your Pinata account will have a structure that looks as follows:
2.5 Get your Metadata API URL
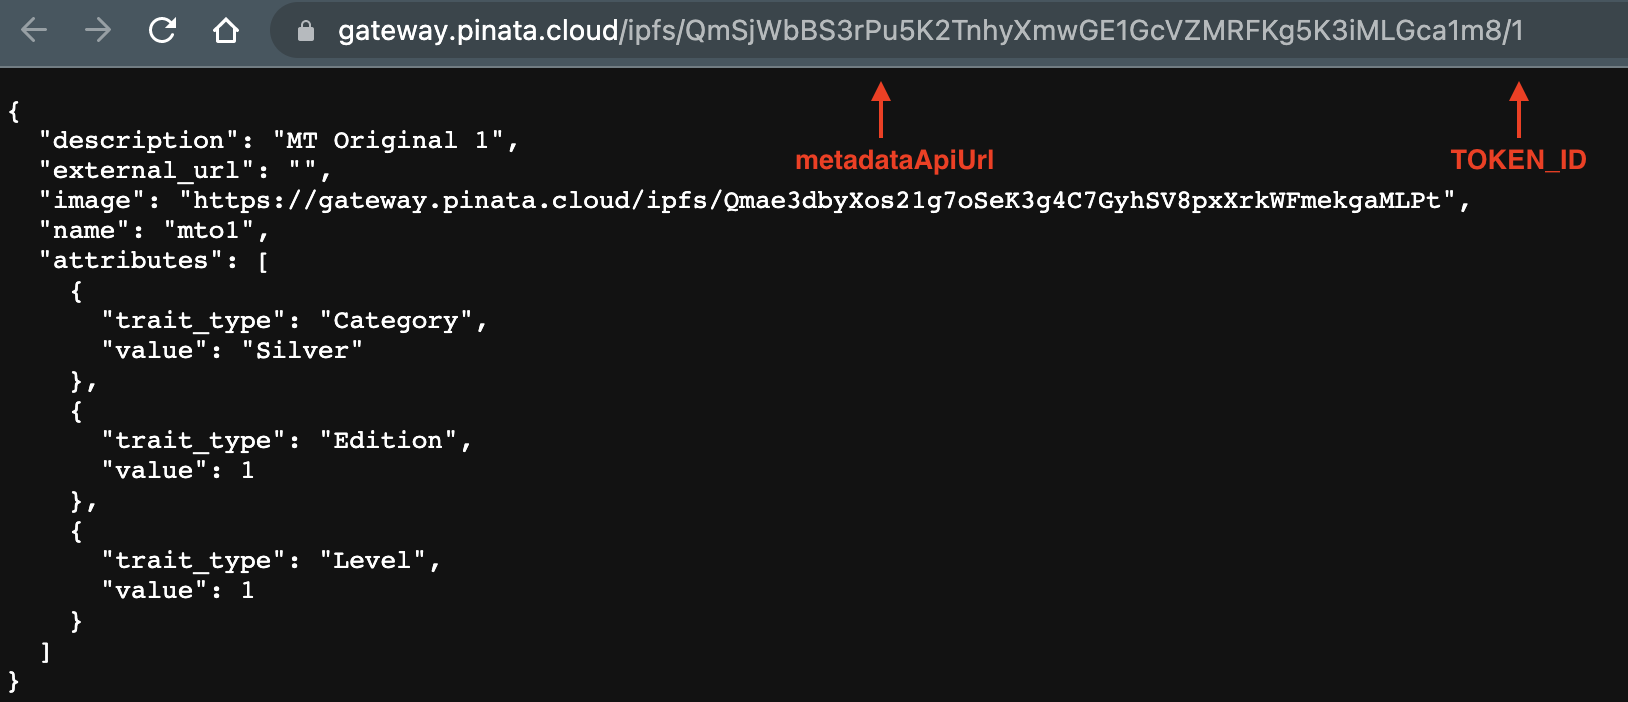
Finally, click the 👁 icon on your newly uploaded folder and copy the URL.

The copied link will be your metadataApiUrl. To verify that you set up everything correctly, open your browser at metadataApiUrl followed by a TOKEN_ID as a number.
It should return a JSON object that represents the metadata of that particular asset.
The example below returns metadata of the first asset in a given collection:
Make sure there is no trailing / at the end of the metadataApiUrl or you won't be able to mint assets.
3. Create a Collection
You can find the full implementation of this code sample in the myria-ts-samples repository.
You can create a new Myria collection as follows:
Open a Typescript project created here
Create the
create-collection.tsfile in the above project and paste this code:
- Typescript
import { CollectionManager, CreateCollectionParams, CreateCollectionResponse, EnvTypes } from "myria-core-sdk";

(async (): Promise<void> => {
  // define the environment: STAGING or PRODUCTION
  const env = EnvTypes.STAGING;

  // get access to the `CollectionManager`
  const collectionManager: CollectionManager = new CollectionManager(env);

  // define params
  const params: CreateCollectionParams = {
    name: "COLLECTION_NAME",
    description: "COLLECTION_DESCRIPTION",
    contractAddress: "CONTRACT_ADDRESS",
    metadataApiUrl: "METADATA_API_URL",
    ownerPublicKey: "OWNER_PUBLIC_KEY",
    projectId: "PROJECT_ID",
    starkKey: "STARK_KEY"
  };

  // create a collection
  const collectionResponse: CreateCollectionResponse | undefined =
    await collectionManager.createCollection(params);

  // log the result
  console.log(JSON.stringify(collectionResponse, null, 2));
})();
Replace the params values as follows:
COLLECTION_NAME- collection nameCOLLECTION_DESCRIPTION- collection descriptionCONTRACT_ADDRESS- contract address used to withdraw assets to the Ethereum networkMETADATA_API_URL- API URL that will store collection metadataPROJECT_ID- project id to which the collection will belongSTARK_KEY- Stark Key, has to start with0x
- Add a script to load the
create-collection.tsfile inpackage.json:
{
  "scripts": {
    "create-project": "ts-node create-project.ts",
    "create-collection": "ts-node create-collection.ts",
  },
}
- Run the
create-collectionscript:
npm run create-collection
After a collection is created, you will see the response that looks as follows:
CreateCollectionResponse
{
  "id": 19,
  "createdAt": "2022-07-12T10:10:22.192Z",
  "updatedAt": "2022-07-12T10:10:22.192Z",
  "name": "MT Collection",
  "collectionImageUrl": null,
  "description": "MT original",
  "iconUrl": null,
  "contractAddress": "0x365bdeE115b3Ad192a494FDa6a4d18E79fdf03Af",
  "ownerPublicKey": "0x75e0D99fa416823F4C07CDafC86A3B0cA37B52A5",
  "metadataApiUrl": "https://gateway.pinata.cloud/ipfs/QmSjWbBS3rPu5K2TnhyXmwGE1GcVZMRFKg5K3iMLGca1m8",
  "starkKey": "0x43be26f8a75d1fc532a871ed88561f75fadd1a901b4fed01d0c8ef48762f1a9",
  "publicId": "24dd6da6-e129-4e4f-ab01-a4408649f3bd",
  "isHot": false,
  "metadataSchema": [],
  "project": {
    "id": 33,
    "createdAt": "2022-07-07T11:28:14.731Z",
    "updatedAt": "2022-07-12T10:10:22.213Z",
    "name": "Test Game",
    "companyName": "Gaming Studio X",
    "contactEmail": "test@google.com",
    "collectionLimitExpiresAt": "2022-08-08T15:07:01.266Z",
    "collectionMonthlyLimit": 5,
    "collectionRemaining": 3,
    "mintLimitExpiresAt": null,
    "mintMonthlyLimit": 50000,
    "mintRemaining": 50000,
    "publicId": "3a81b6f4-821e-48ae-bcd5-0d99533c9136",
    "__entity": "ProjectEntity"
  },
  "__entity": "CollectionEntity"
}
4. Create a Collection Metadata Schema
This is a mandatory step before you can start the minting process. If you don't add a metadata schema for your collection, you won't see your assets' attributes and filtering options on the Myria Marketplace.
You can create a metadata schema for your collection as follows:
Open a Typescript project created above.
Create the
create-metadata-schema.tsfile and paste this code:
- Typescript
import { CollectionManager, EnvTypes, CreateCollectionMetadataParams, CollectionDetailsResponseData, Metadata } from "myria-core-sdk";

(async (): Promise<void> => {
  // define the environment: STAGING or PRODUCTION
  const env = EnvTypes.STAGING;

  // get access to the `CollectionManager`
  const collectionManager: CollectionManager = new CollectionManager(env);

  // define collection contract address and stark key
  const contractAddress: string = "CONTRACT_ADDRESS";
  const starkKey: string = "STARK_KEY";

  // define the metadata schema
  const metadataSchema: Metadata[] = [
    {
      name: "ATTRIBUTE_NAME_1",
      type: "enum",
      filterable: true
    },
    {
      name: "ATTRIBUTE_NAME_N",
      type: "enum",
      filterable: false
    }
  ];

  // define params
  const params: CreateCollectionMetadataParams = {
    metadata: metadataSchema,
    starkKey: starkKey
  };

  // create a schema
  const response: CollectionDetailsResponseData = await collectionManager.createCollectionMetadataByAddress(contractAddress, params);
})();
Replace the contractAddress and starkKey values as follows:
CONTRACT_ADDRESS- contract address used to withdraw assets to the Ethereum networkSTARK_KEY- Stark Key, has to start with0x
Each metadata schema object has three properties:
name- the name of the metadata schema attribute. Should matchtrait_typein the Opensea metadata schema.type- the type of the metadata schema attribute. Acceptsenum,string, andnumber. In most cases, you should useenum.filterable- the flag that defines if the attribute should be filterable on the Myria marketplace. Acceptstrueorfalse.
- Add a script to load the
create-metadata-schema.tsfile inpackage.json:
{
  "scripts": {
    "create-project": "ts-node create-project.ts",
    "create-collection": "ts-node create-collection.ts",
    "create-metadata-schema": "ts-node create-metadata-schema.ts"
  },
}
- Run the
create-metadata-schemascript:
npm run create-metadata-schema
After a metadata schema is created, you will see the response that looks as follows:
CollectionDetailsResponseData
{
  "status": "success",
  "data": {
    "id": 129,
    "name": "Buidlers v3",
    "collectionImageUrl": null,
    "description": "A third iteration of Buidlers collection",
    "iconUrl": null,
    "contractAddress": "0x615876a6978986e1fe3ef9e8404ae41e61196c62",
    "ownerPublicKey": "0x7b08c88a6d0f27620798b57f3d744c62b0dea634",
    "metadataApiUrl": "https://gateway.pinata.cloud/ipfs/QmXe7YfTbd5fWh1F7eNXvGNgxaASDb6fKikrZBLCgxYW4v",
    "starkKey": "0x7d682c993fa1090bf7cdc9598bf7e0062b1d0308c90e1fafca44d867cdf05f4",
    "publicId": "d300e048-fd74-4c1c-b967-35ed0982e0f3",
    "isHot": false,
    "metadataSchema": [
      {
        "name": "Race",
        "type": "enum",
        "filterable": true
      },
      {
        "name": "Power",
        "type": "enum",
        "filterable": true
      }
    ],
    "createdAt": "2022-10-05T10:55:28.253Z",
    "updatedAt": "2022-10-06T03:29:52.757Z",
    "project": {
      "id": 120,
      "name": "Solid project",
      "companyName": "Solid company",
      "contactEmail": "solid@gmail.com",
      "publicId": "69a7f268-4f9b-4f3f-b46a-b8830a589399"
    },
    "totalAssets": 8,
    "totalAssetsForSale": 8
  }
}
Next steps
Now that you have a Myria collection, you can mint assets into that collection.